- 서버전문업체 아이티마야
- HPC서버
-
GPU서버
-
4GPU Server
-
8GPU Server
-
HGX Server
-
2GPU Workstation
-
4GPU Workstation
-
나라장터 등록제품
-
Compact AI
-
10GPU Server
-
- BigData서버
- 가상화/HCI
- 스토리지/파일서버
-
WEB/WAS/DB
-
WEB Server
-
WAS Server
-
고성능 DB
-
타워형서버
-
나라장터 등록제품
-
-
워크스테이션
-
1CPU Workstation
-
2CPU Workstation
-
나라장터 등록제품
-
-
MLOps/SW지원/유지보수
-
Cloud
-
Open Source
-
NVIDIA
-
HCI
-
Backup
-
MLOps
-
HW/SW 유지보수
-
테크니컬 스토리
아이티마야의 새로운 기술 뉴스를 만나보세요.k8s에서 외부 Ceph Storage Cluster를 기본 StorageClass로 사용하기
등록일
2023.01.27
첨부파일
다른 용도로 사용 중인 Ceph Storage를 Kubernetes에서도 이어 사용할 수 있습니다.
k8s에서 외부 Ceph Storage Cluster를 기본 StorageClass로 사용하기
Kubernetes에서 스토리지 클래스로 사용할 수 있는 스토리지 종류는 다양합니다.
Local, AWS EBS, AzureFile, AzureDisk, CephFS, CephRBD, NFS, iSCSI, Glusterfs 등을 제공하고,
나열된 방식 외에도 많은 볼륨 플러그인을 사용할 수 있습니다.
본 포스팅은 별도로 구성된 Ceph 클러스터를 k8s에서 StorageClass로 사용하는 방법을 다루고 있습니다.
Ceph Storage를 여러 목적으로 다양하게 사용하는 구성으로 적합합니다.

- Ceph-csi 설치
전에는 Ceph 을 k8s에서 사용하기 위해, 별도의 provisioner를 복잡하게 구성해야 했습니다. 최근 k8s의 정책 변화로 권장하고 있는 ceph-csi를 통해 간단하게 구성할 수 있습니다. ceph-csi는 git에서 제공하는 yaml 파일로도 구성할 수 있지만, 여기서는 helm을 통해 구성하겠습니다.
chart 설정 파일 예제와, storage class, pod 등등 생성 시 참고 example은 git에서 다운로드할 수 있습니다.
$ git clone https://github.com/ceph/ceph-csi.git
- (CephFS) CephFS를 스토리지 클래스로 사용
CephFS는 Ceph에서 제공하는 파일 스토리지입니다. ReadWriteMany 특성의 PVC를 생성할 수 있습니다. 공용 볼륨으로 쓰거나, 데이터 셋 저장 후 공유 목적으로 사용하기에 적합합니다.
- (CephFS) 환경 설정 파일 구성
설치 전에, 설정 파일을 구성합니다. 여기서는 csiConfig, secret, StorageClass 관련 설정만 미리 넣어 구성합니다. 미리 넣지 않고 추후 구성도 가능합니다. 설정 파일은 /ceph-csi/charts/ 경로의 values.yaml 파일을 참고할 수 있습니다.Ceph의 mon 정보와 keyring 정보는 이전 ceph 구성 포스팅을 참고하시면 됩니다.
- (k8s master)
- $ vi values.yaml
- csiConfig:
- - clusterID: "test-cephfs"
- monitors:
- - "192.168.0.138:6789"
- - "192.168.0.138:6789"
- - "192.168.0.141:6789"
- secret:
- create: true
- name: "ceph-fs-secret"
- adminID: "admin"
- adminKey: "AQD81LRjujj5ERAASy7HgGX92yusPCYDiJIOjg=="
- storageClass:
- create: true
- name: ceph-fs-sc
- annotations:
- storageclass.beta.kubernetes.io/is-default-class: "true"
- storageclass.kubesphere.io/supported-access-modes: '["ReadWriteOnce","ReadOnlyMany","ReadWriteMany"]'
- clusterID: "test-cephfs"
- fsName: "chunvol1"
- pool: "cephfs.chunvol1.data"
- provisionerSecret: ceph-fs-secret
- provisionerSecretNamespace: ceph-fs
- controllerExpandSecret: ceph-fs-secret
- controllerExpandSecretNamespace: ceph-fs
- nodeStageSecret: ceph-fs-secret
- nodeStageSecretNamespace: ceph-fs
- reclaimPolicy: Delete
- allowVolumeExpansion: true
- mountOptions:
- - discard
위 구성 파일에서는 3가지 구성을 포함하고 있습니다. helm 구성 시 csiConfig만 구성하고, secret과 storageclass는 추후 구성해도 상관없습니다.
1. csiConfig : ceph 클러스터의 서버 정보 (mon 서버 정보)
2. secret : ceph 클러스터의 연결 계정 정보 (keyring)
3. storageClass : k8s에 생성될 storageclass 정보
- (CephFS) ceph-csi 차트 설치 및 제거
- (k8s-master)
- ceph-csi-chart - helm repo 추가
- $ helm repo add ceph-csi https://ceph.github.io/csi-charts
- $ helm search repo ceph-csi
- cephfs csi 설치 및 확인
- $ kubectl create namespace "ceph-fs"
- $ helm install --namespace "ceph-fs" "ceph-fs-sc" ceph-csi/ceph-csi-cephfs -f values.yaml
- $ helm status "ceph-fs-sc" -n "ceph-fs"
- cephfs csi 제거
- $ helm uninstall "ceph-fs-sc" --namespace "ceph-fs"
- $ kubectl delete namespace "ceph-fs"
- (CephFS) PVC 생성
PVC를 생성하면 자동으로 PV도 함께 생성되고 연결됩니다. PVC 생성 예제 파일도 마찬가지로 ceph-csi/example/에서 확인할 수 있습니다.
- $ vi cephfs-pvc01.yaml
- ---
- apiVersion: v1
- kind: PersistentVolumeClaim
- metadata:
- name: cephfs-pvc01
- spec:
- accessModes:
- - ReadWriteMany
- resources:
- requests:
- storage:5Gi
- storageClassName: csi-fs-sc
- $ kubectl apply -f cephfs-pvc01.yaml
- $ kubectl get pvc
- (CephFS) pod 생성
아래와 같이 Pod 생성 시 PVC를 연결할 수 있습니다. 관련 예제 파일은 ceph-csi/example/에서 확인할 수 있습니다.
- $ vi cephfs-pod01.yaml
- ---
- apiVersion: v1
- kind:Pod
- metadata:
- name:csi-cephfs-test-pod
- spec:
- containers:
- - name: test-pod01
- image: nginx
- volumeMounts:
- - name: test-pvc01
- mountPath: /data
- volumes:
- - name: test-pvc01
- persistentVolumeClaim:
- claimName: cephfs-pvc01
- readOnly: false
- $ kubectl apply -f cephfs-pod01.yaml
- $ kubectl get pod -n default
- (CephFS) PVC IO 성능 테스트
- 1만개의 4k 파일
- $ time cp -r /olddata /data/
- real 0m2.608s
- user 0m0.055s
- sys 0m0.259s
- 1개의 4.4GB 파일
- $ time cp -r /bigsize /data/
- real 0m18.652s
- user 0m0.000s
- sys 0m3.515s
- (RBD) Ceph RBD를 스토리지 클래스로 사용
RBD는 Ceph에서 제공하는 블록 스토리지입니다. ReadWriteOnce 특성의 PVC를 생성할 수 있습니다. 대체적으로 CephFS 보다 성능이 높지만, 볼륨 공유가 안되는 블록 스토리지입니다.
- (RBD) Configmap 구성 파일 생성
CephFS 와 마찬가지로 helm 을 통해 csi-rbd 프로비저너를 설치합니다.
이번에는 구성 파일을 csiConfig, secret, storageClass 각각 별개로 구성하도록 하겠습니다.
- $ vi csiconfig.yaml
- csiConfig:
- - clusterID: "test-ceph-rbd"
- monitors:
- - "192.168.0.138:6789"
- - "192.168.0.140:6789"
- - "192.168.0.141:6789"
- (RBD) ceph-csi-rbd 설치
- (k8s-master)
- ceph-csi-chart - helm repo 추가
- $ helm repo add ceph-csi https://ceph.github.io/csi-charts
- $ helm search repo ceph-csi
- RBD 설치 및 확인
- $ kubectl create namespace "ceph-rbd"
- $ helm install --namespace "ceph-rbd" "ceph-rbd-sc" ceph-csi/ceph-csi-rbd -f csiconfig.yaml
- $ helm status "ceph-rbd-sc" -n "ceph-rbd"
- RBD csi 제거
- $ kubectl create namespace "ceph-rbd"
- $ helm uninstall "ceph-rbd-sc" --namespace "ceph-rbd"
- $ kubectl delete namespace "ceph-rbd"
- (RBD) RBD Secret 추가
- $ vi secret.yaml
- apiVersion: v1
- kind: Secret
- metadata:
- name: ceph-rbd-secret
- namespace: ceph-rbd
- stringData:
- userID: admin
- userKey: "AQD81LRjujj5ERAASy7HgGX92yusPCYDiJIOjg=="
- ---
- $ kubectl apply -f secret.yaml
- (RBD) StorageClass 추가
StorageCalss를 추가할 때 가장 중요한 건, csiConfigmap 구성 시 ClusterID가 같아야 하고, ceph에서 RBD 풀로 초기화한 Pool 정보가 정확해야 합니다.
그리고, 바로 위에서 생성한 secret 이름과 namespace도 매우 중요합니다.
StorageClass는 관련 정보가 잘못되어도 생성됩니다. StorageClass가 생성되었는데도 불구하고,
PVC 생성이 안된다면 StorageClass 정보 값이 잘못된 경우가 많습니다.
- $ vi storageclass.yaml
- apiVersion: storage.k8s.io/v1
- kind: StorageClass
- metadata:
- name: rbd
- annotations:
- storageclass.beta.kubernetes.io/is-default-class: "true"
- storageclass.kubesphere.io/supported-access-modes: '["ReadWriteOnce","ReadOnlyMany","ReadWriteMany"]'
- provisioner: rbd.csi.ceph.com
- parameters:
- clusterID: "test-ceph-rbd"
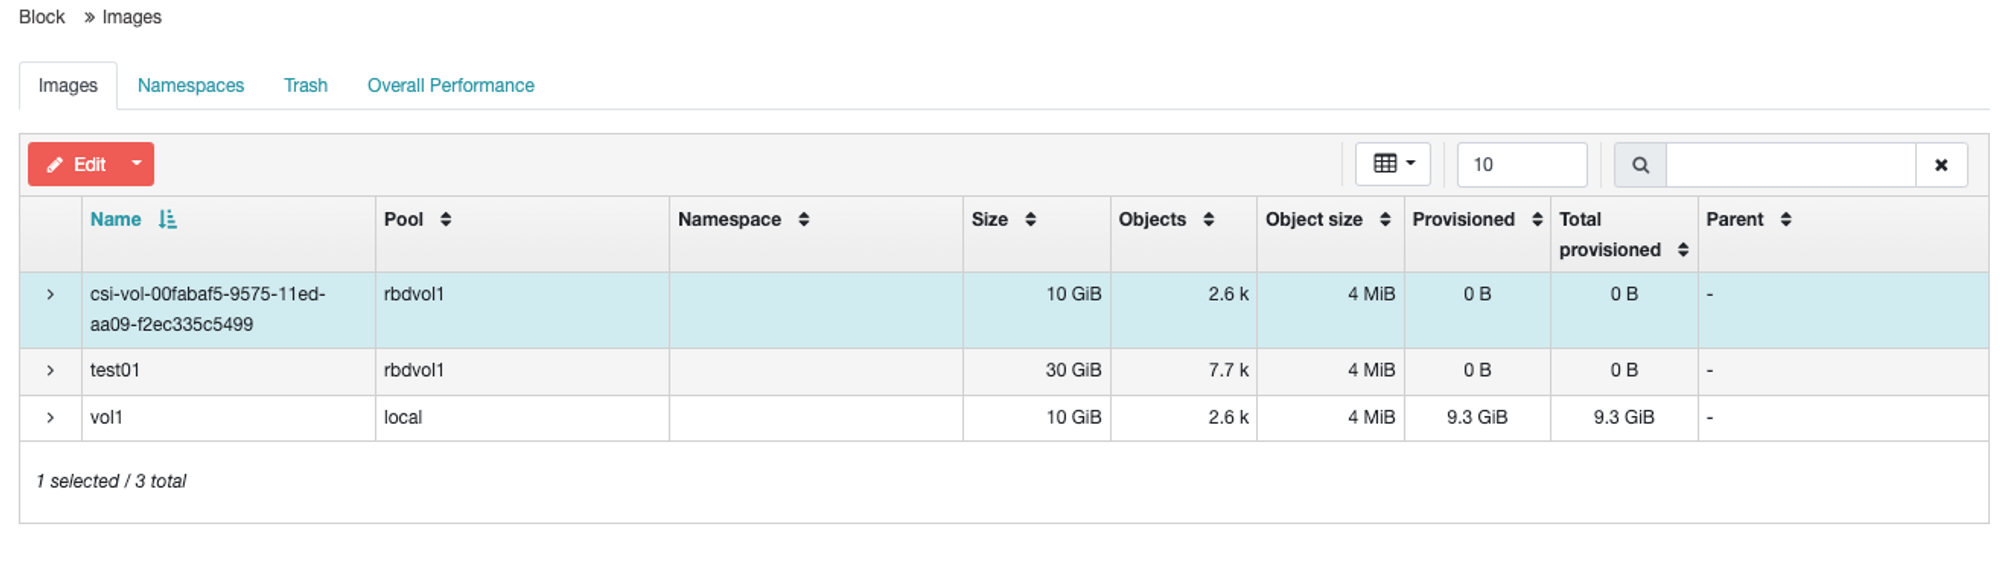
- pool: "rbdvol1"
- imageFeatures: layering
- csi.storage.k8s.io/provisioner-secret-name: ceph-rbd-secret
- csi.storage.k8s.io/provisioner-secret-namespace: ceph-rbd
- csi.storage.k8s.io/controller-expand-secret-name: ceph-rbd-secret
- csi.storage.k8s.io/controller-expand-secret-namespace: ceph-rbd
- csi.storage.k8s.io/node-stage-secret-name: ceph-rbd-secret
- csi.storage.k8s.io/node-stage-secret-namespace: ceph-rbd
- csi.storage.k8s.io/fstype: ext4
- reclaimPolicy: Delete
- >allowVolumeExpansion: true
- mountOptions:
- - discard
- $ kubectl apply -f storageclass.yaml
- (RBD) PVC 생성
CephFS와 가장 큰 차이점은 PVC 생성 시 accessModes 값을 ReadWriteOnce로 구성했다는 것입니다.
RBD는 ReadWriteMany로 구성할 수 없습니다.
- $ vi pvc.yaml
- ---
- apiVersion: v1
- kind: PersistentVolumeClaim
- metadata:
- name: rbd-pvc
- spec:
- accessModes:
- - ReadWriteOnce
- resources:
- requests:
- storage: 10Gi
- storageClassName: rbd
- $ kubectl apply -f pvc.yaml
- $ kubectl get pvc
- (RBD) pod 생성 및 확인
PVC까지 정상적으로 생성되었고, PVC의 상태가 bound로 확인된다면, Pod와 연결할 수 있습니다.
RBD로 구성된 PVC는 1개의 Pod와 연결됩니다.
- $ vi pod.yaml
- ---
- apiVersion: v1
- kind: Pod
- metadata:
- name: rbd-test-pod01
- spec:
- containers:
- - name: web-server
- image: nginx
- volumeMounts:
- - name: rbd1
- mountPath: /data
- volumes:
- - name: rbd1
- persistentVolumeClaim:
- claimName: rbd-pvc
- readOnly: false
- $ kubectl apply -f pod.yaml
- $ kubectl exec -ti rbd-test-pod01 /bin/bash
- rdb-test-pod01> df -h
- (RBD) Ceph 노드에서 이미지 생성 여부 확인
PVC 생성이 잘 되었다면, Ceph 노드에서 RBD 이미지가 생성된 것을 확인할 수 있습니다.
물론, Ceph Dashboard에서도 해당 내용 확인이 가능합니다.
Ceph에서는 RBD 이미지이지만, 사용하는 클라이언트에서는 물리 디스크로 인식하게 됩니다.
- (ceph Bootstrap)
- $ rbd list rbdvol1
- (RBD) RBD IO 성능 테스트
- 1만개의 4k 파일
- $ time cp -r /olddata /data/
- real 0m0.223s
- user 0m0.016s
- sys 0m0.198s
- 1개의 4.4GB 파일
- $ time cp -r /bigsize /data/
- real 0m15.778s
- user 0m0.007s
- sys 0m4.481s
-
 이전글
이전글 아파치 카프카 (Apache Kafka)오픈소스 분산형 스트리밍 플랫폼 - Apache Kafka 아파치 카프카 (Apache Kafka) Apache Kafka 란? Apache Kafka는 오픈소스 분산 스트리밍 플랫폼이며 주로 데이터 파이프 라인을 만들 때 사용되는 솔루션입니다. Apache Kafka 용어 설명 1. 브로커 (Broker) : 카프카가 설치되어 있는 서버 혹은 노드 등을 ...2023.02.13
 -
다음글

 Kubernetes LoadBalancer 사용 (MetalLB)K8s LoadBalancer 사용을 위한 MetalLB Kubernetes LoadBalancer 사용 (MetalLB) k8s는 대다수의 서비스를 함께 배포하지만, 일부 서비스는 외부 서비스를 사용해야 합니다. 그중 대표적인게 네트워크 서비스 중 하나인 LoadBalancer입니다. k8s에서 제공하는 네트워크 모드는 clusterIP, NodePort...2023.01.27